1. Getting Started
1.1. Preface
In Computer Seminar I, you are going to review and further develop the computer programming techniques you have learned in several courses, and learn methodologies for developing programs of a certain scale or larger.
Don’t be too intimidated by the idea of developing a program of a certain size, because the actual size of the programs we deal with in this course is only a few hundred lines. Even so, for many of you, this will be the first time you have ever written a program of this scale.
When developing a program of a certain size, it is rare nowadays to be able to create it all by yourself from scratch. It is important to make use of the software assets developed by our predecessors. Such software assets may be commercial or free libraries, or may be secret programs accumulated by your predecessors in your laboratory or workplace. Either way, you will need to have the skills to research and understand the specifications and usage of these assets in order to create your own work.
In this course, you will develop simple graphics applications that can be run interactively using the Python programming language and the pygame 2D graphics library, while acquiring the knowledge and skills to utilize existing software components.
In addition, you will learn the basic concepts of what makes a software component easy to use and how to avoid soggy spaghetti code when writing a new program.
Along with these, the course aims to help you acquire standard procedures for writing programs. I often hear students say, “I’m not good at programming,” or “I don’t like computer science subjects,” and when I see such people programming, I sometimes think that their problem is not so much in understanding computers or programming languages, but simply in code writing procedures.
For example, I often see people who input 20 or 30 lines of sample code from a textbook at once, and when they try to run it, it doesn’t work properly, and they can’t figure out what’s wrong. Then they get depressed because they think that they are not talented enough to be good programmers. That’s not true. When we write 30 lines of code, it is natural to have one or two mistakes. And it is very difficult for anyone to find a single spelling mistake or omission in 30 lines of code.
That’s why professionals never type 30 lines of code all at once; they run a grammar check after one line, or a few lines at most. When it works, they record the history so that they can always go back to the code at that point.
Sounds tedious? But if you use the right tools, these things can be done naturally, with a minimum of extra effort. In this course, you are going to learn the concepts of and how to use such tools, including integrated development environments, source code management tools, debuggers, and unit test frameworks.
As you can see from the name, pygame is a library that is also used for game development. We will not create a game in this course, but we will see examples of programs that run in real time in response to mouse and key input, which will be exciting. We hope that even one more person will find programming fun.
Therefore, this text does not cover all the features of Python. The emphasis is on conveying basic ideas and concepts that can be applied to programming in other languages, rather than focusing on the so-called “Pythonic way” of writing code.
The specific mechanism and name may differ depending on programming languages. In Python, libraries are managed in terms of modules and packages.
The original meaning of the word “code” is a system of characters or symbols that represent some message. Here it refers to a representation of instructions to a computer as a sequence of digits or characters.
So, for example, the process of examining specifications while drawing flowcharts and other diagrams may be part of “programming”, but it is not usually included in “coding”. Coding is the process of actually expressing the program as a sequence of characters, digits, and symbols, and the product of that process is called code.
1.2. Installation
Pre-configured software (for Windows 64-bit edition) is distributed for this course:
Further, you can install Python packages and VSCode extensions as needed, referring to Appendix B. If you are a skilled user, you may use another development environment or editor other than VSCode at your own risk.
From the zip file, you only need the assets folder. Place it in the same location as the projects folder you will create.
The zip file includes the followings:
- WinPython + pygame (+ some other packages)
- VSCodium (open source version of Visual Studio Code)
- MinGit (minimal set of Git)
- Configuration files and batch files to run them
Download the zip file, and extract it into C:/ folder (In this textbook, we write / as a folder separator). The folder structure should look like the following.
It is also possible to place the file in another location (e.g., a drive other than C), but it is recommended that the folder path name (a string consisting of the folder names from the drive name to the folder in question, connected in order by /) be as short as possible and do not contain non-ASCII characters or whitespaces.
The most recommended location is near the top of each drive, such as C:/ or D:/. What we do not recommend are under Desktop, Downloads, Documents, Program Files, etc.
When you right-click on a zip file and select “Extract All”, the standard Windows zip extractor will start extracting the files. However, when extracting a large number of files, it may be extremely slow.
Since there are many problems as pointed out in the following Q&A, it is recommended to use dedicated software to extract compressed files such as zip. Well-known ones include 7-Zip and Lhaplus. Even if you take into account the time required for installation, I think the result will be faster.
For historical reasons, some Windows applications cannot handle folder path names that are too long. The most commonly encountered is the 255 character limit.
This zip file contains some files with very long pathnames. The longest one I counted was 218 characters. Insane.
cs1/VSCodium-win32-x64/data/extensions/.145a3e8e-1962-4582-8e7a-e698fd1889d0/pythonFiles/lib/jedilsp/jedi/third_party/django-stubs/django-stubs/contrib/contenttypes/management/commands/remove_stale_contenttypes.pyi
So extracting it to a folder with a pathname longer than 37 characters may cause problems depending on the application used.
And the standard Windows zip extractor falls well short of this limitation. Insane.
Not only in this course, but also in many other cases where this restriction becomes a problem, I recommend using dedicated software to extract compressed files such as zip.
We distribute the pre-configured environment to prevent you from getting stuck in the installation and configuration process, but the VSCode license does not allow such redistribution.
Since VSCodium is a public package built from the same source code as VSCode, and redistribution is not prohibited, we use it to distribute our pre-configured environments.
First, the installation commands (e.g. pip install) should be executed at the command prompt dedicated to this environment, as described in the next section.
Also, please note that there is no guarantee that the libraries you have installed will not interfere with the libraries used in the course material. It is recommended that you backup the entire C:/cs1 folder beforehand.
1.3. Running Python
Double-click C:/cs1/command_prompt_cs1.bat from Windows Explorer to execute it. This will open a command prompt that has been configured for this exercise.
To verify that Python and pygame are installed correctly, run the following command. Please note that sound is played, so please execute the command in a place where you will not disturbe other people, or turn off the speakers of your PC beforehand.
C:\cs1\projects>python -m pygame.examples.aliens
If it looks like a game, then Python and pygame are correctly installed. You can use the left/right cursor keys and the spacebar to play.
…
Okay, that’s enough playing, let’s move on.
We’ll use this command prompt later, so it’s convenient to leave it open.
C:cs1projects>python -m pygame.examples.aliens?python -m pygame.examples.aliens- The
C:\cs1\project>part is called the prompt, which is pre-displayed. It tells you which folder you are currently in. pythonis the name of the command to run the Python program.-m pygame.examples.aliensis the argument to this command, which tells the command what to do in detail.- Press Enter to execute the command you have typed in.
Let’s try to write a program by ourselves. After setting up an environment for a new programming language, we usually write a program that displays “hello, world”, as the Constitution of Japan says to do so (No, it doesn’t).
With Windows Explorer, create a folder called “hello” in C:/cs1/projects, and create a new empty text file in the folder. Make sure that the name of the created file is shown as “New Text Document.txt”. If it is shown as “New Text Document” without the suffix “.txt”, see the following Q&A.
The last part of the file name, such as “.txt”, is called the file extension in Windows and indicates the type of the file.
In Windows, this part is not displayed by default. Expand the “View” ribbon of the toolbar at the top of Explorer, and check the “File Name Extensions” checkbox in the “Show/Hide” section. You should see “.txt” at the end of the file name.
I’m not afraid to criticize, but the default Windows setting of “Hide file extensions” is clearly harmful, both in terms of convenience and security. Please make it a habit to always show them.
Then, rename the file into hello.py. Open the file with Windows Notepad or something similar and write the following line.
1print("hello, world")
This is a one-line program that prints a string by passing it to the print function as an argument.
- A function is something like a command that can be used in a program (it is not the same as a mathematical function).
printis a pre-defined function in Python.- Functions can be called by appending
()to the end of the function name. It can be understood as something similar to “executing a command”. - When calling a function, arguments may be specified in the trailing (). The specified arguments determine what the function will execute.
- When the
printfunction is called, the contents of the argument will be printed. - Content enclosed in quotation marks, such as “hello, world,” indicate a string. The quotation marks are the symbol to indicate that the inside is a string, not part of the string itself.
- In the end, this one statement means to print the string
hello, world.
On the command prompt you just opened, navigate to the folder you just created with the following command and run hello.py.
C:\cs1\projects>cd hello
C:\cs1\projects\hello>python hello.py
hello, world
If you see “hello, world” in the next line after executing the command, you have succeeded. The command prompt will be used again later, so please leave it open.
1.4. Visual Studio Code (VSCode)
In principle, it is possible to develop a Python program with a text editor like Notepad and the python command. However, it is much more efficient to use a specialized environment for program development.
Visual Studio Code (hereinafter referred to as VSCode) is basically a text editor with rich functionalities, but it can also be used as an integrated development environment including a source code editor, debugger, source code management system, and other functions by installing and setting various extensions. In the distributed environment, the basic installation and settings have been completed.
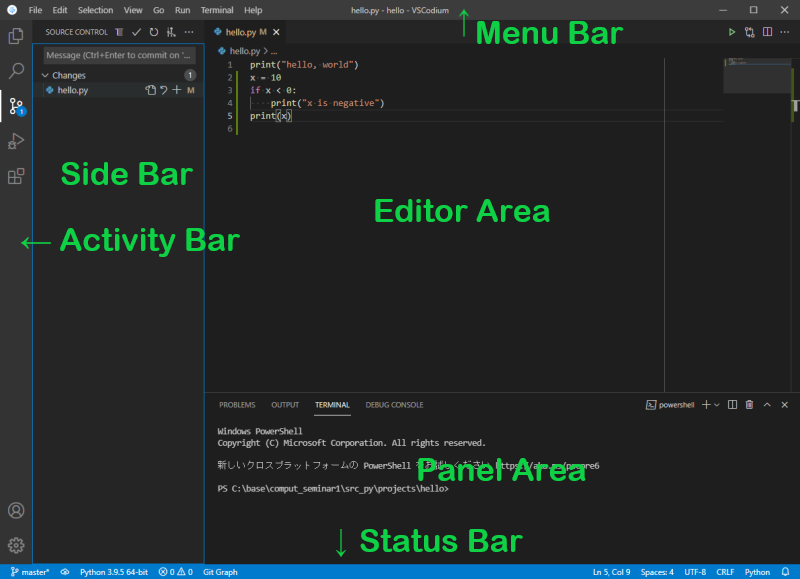
Double-click on C:/cs1/vscode_cs1.bat to open VSCode. Remember that the areas in VSCode screen are called by the following names.
To open the settings.json file, open View ‣ Command Palette from
the menu bar, and select Preferences: Open User Settings (JSON).
(There are many choices, so you may want to type “settings” to
narrow down the list. Be careful not to confuse it with
Preferences: Open Default Settings (JSON) and alike).
You can change the settings to your liking, but it may not work as described in this textbook. Please make sure you understand the meaning of the changes and their impact before changing them.
Open the folder C:/cs1/projects/hello. Select File ‣ Open Folder from the menu bar.
You will get a dialog window asking “Do you trust the authors of the files in this folder?” Click yes because it contains your program. (You may want to check the checkbox “Trust the authors of all files in the parent folder ‘projects’” because you will only put your own files in the folder C:/cs1/projects)
Open the Explorer sidebar from the activity bar (or View ‣ Explorer), and double-click on hello.py. The Python program you just typed should now appear in the editor area.
At this point, look at the title bar of the VSCode window. If you have
followed the instructions so far using our pre-configured environment,
you should see hello.py - hello - VSCodium (Computer Seminar I) as shown below. If not,
examine the following checkpoints.

- If you don’t see
hello.pyon the left, the program is not displayed in the editor area. - If you see something other than
hello(e.g.projects) in the middle, you have opened a wrong folder by File ‣ Open Folder. - If nothing is shown in the middle (i.e.,
hello.py - VSCodiumis shown), you did not execute File ‣ Open Folder (e.g. File ‣ Open File was executed?). - If you see
Visual Studio Codeinstead ofVSCodiumon the right, another version of VSCode that was installed in the past is running instead of the one in our pre-configured environment. Use vscode_cs1.bat to restart the correct one.
With the program hello.py displayed, run the program using Run ‣ Run Without Debugging. The results will be displayed in the Terminal in the panel area at the bottom of the screen. (The blue text is the command that VSCode used to execute, so you don’t have to care about it. If you see “hello, world” in the next line, it’s OK)
1.5. Git (Command-line operations)
From now on, you’re going to be creating new programs and updating them little by little. While you’re working on them, you’ll often run into the following situations:
- “It was working yesterday, but it stopped working after some trial and error. I thought I restored it to yesterday’s state, but it doesn’t work.”
- “I left the files that were working as hello.py.backup.ver1 and hello.py.backup.ver2, but now I don’t know which one is which.”
- “I thought I had put the date in the file name so that I would know when the file was created, but the date in the file name was wrong and I still don’t know which one is which.”
These are common problems not only in program development.
It’s a bit of a hell.
Tools for recording and managing the program history during development to avoid these stuations are called source code management system (SCM) or version control system (VCS). Recently, a software called Git has been widely used. You may have seen websites such as github that share software managed by Git.
Code written in Python or C is converted into machine language code that is directly executable by a computer and then executed. “Source” code means the code from which this conversion is made. It is often simply abbreviated to “source”. As an antonym, the code at which this conversion is aimed is called object code.
In this textbook, code almost certainly refers to a program written in Python, so code and source code are synonymous. However, in general, code is not always synonymous with source code, and may refer to object code.
In this course, we’ll be using Git from VSCode, but it’s important to understand what’s going on behind the scenes of an integrated development environment, so we’ll see how Git is run as a command in a moment.
Go back to the command prompt, you should be at C:/cs1/projects/hello (if not, use the cd command to navigate there). Execute the following.
C:\cs1\projects\hello>git init
You’ll see a hint in yellow text, but don’t worry about it. This command will initialize your Git repository. Think of it as a storage where you can keep track of previous versions of your files. (The repository is stored in a folder called C:/cs1/projects/hello/.git.)
We are going to record into this repository the version of hello.py that you just created. To do so, we first perform a staging operation.
C:\cs1\projects\hello>git add hello.py
At this point, recording in the repository is not yet complete. It has been selected to be recorded in the repository. This is called “staging”. Multiple files can be staged.
The actual recording of the staged file to the repository is called committing. This can be done with the following command.
C:\cs1\projects\hello>git commit -m "Initial commit of hello.py."
The string enclosed in “…” following -m is called the commit message. It becomes the first clue to look up the previous version later.
Let’s look at the log to see if it has been recorded.
C:\cs1\projects\hello>git log
You will get the following output:
commit b177c4c152435425b32608476cd5e52ee6b29a03
Author: Computer Seminar I <anonymous@example.org>
Date:   Fri Jan 99 01:01:99 2099 +0900

Initial commit of hello.py.
The mysterious alphanumeric sequence and date string are dummies (there is no such date and time). The author is set to Computer Seminar I, but that’s because that’s the default setting in our pre-configured environment. Don’t worry about it for now.
error: cannot spawn less: No such
file or directory.You may be in trouble if the output is too long to fit in the command prompt, but in this exercise, we’ll move to VSCode before that happens.
Next, let’s modify the current program and record the changes. Go back to the VSCode screen. You should now have hello.py open. Add two lines after the print line to make it look like the following.
1print("hello, world")
2x = 100
3print(x)
You may have some idea of what the program means. It assigns the
integer 100 to the variable x and displays its content. When you are
done, click File ‣ Save to save your work. Run the program with Run ‣
Run Without Debugging, and if you see hello, world and 100, you are
good to go.
During the development of a program, you may want to check the differences from the last time you recorded the program in the repository. You can do so with the following command.
C:\cs1\projects\hello>git diff
You will get the following output:
diff --git a/hello.py b/hello.py
index 9f69d32..8aba1ea 100644
--- a/hello.py
+++ b/hello.py
@@ -1 +1,3 @@
 print("hello, world")
+x = 100
+print(x)
The lines with a leading + are new lines. You don’t need to be able
to read this peculiar display. We’ll learn how to make it more visible
on VSCode soon enough. Anyway, it’s enough to know that it apparently
contains diff information.
I got slightly different results. Did I do something wrong?
diff --git a/hello.py b/hello.py
index 9f69d32..8aba1ea 100644
--- a/hello.py
+++ b/hello.py
@@ -1 +1,3 @@
-print("hello, world")
\ No newline at end of file
+print("hello, world")
+x = 100
+print(x)
With the first example with print("hello, world") line
alone, there probably was no newline character at the end of the
line. The newline character is invisible, but its presence or
absence can be detected by diff command. As a result, the
print("hello, world") line without a newline character was
considered to be deleted, and the print("hello, world") line
with a newline character was considered added. A line with
leading - indicates a deleted line.
It is not wrong for a program to have no newline character at the end of the last line of a file. However, many people prefer to have a newline. VSCode in our development environment shows a blue underline and a “Final newline missing” message (a suggestion for improvement) when there is no newline at the end of the file.
Let’s record this new content in the repository. Recall that what we need to do is to bring it up to the stage, and then commit it. Henceforth, for the sake of convenience, we’ll refer to this process as committing in Git, or simply committing.
C:\cs1\projects\hello>git add hello.py
C:\cs1\projects\hello>git commit -m "Add variable x and print it."
If you check the log, you will see that it is indeed recorded.
C:\cs1\projects\hello>git log
1.6. Code entry and Git operations on VSCode
Now that you know a little bit about Git, let’s take a look at the operations on VSCode that will be used in the course.
1.6.1. Git Graph
You can control Git on VSCode by opening the Source Control sidebar from the activity bar. You can do staging and committing from here, but first, let’s look at the two commits you just recorded.
At the top of the Source Control sidebar, you’ll see a View Git Graph (git log) among a list of icons. Click on it to open the Git Graph. Alternatively, you can click on the string Git Graph in the status bar at the bottom of the VSCode screen.
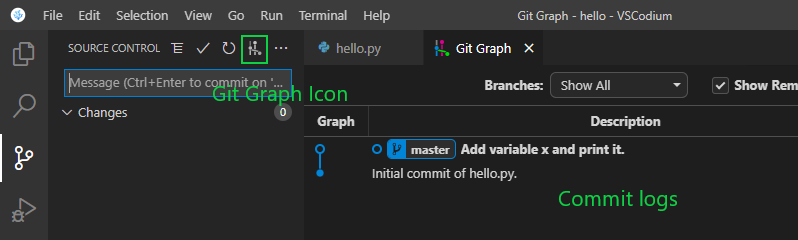
Click on the latest of the two commits shown (the top one). You should see the same output on the left as you saw from the git log command, and the recorded file name hello.py on the right. Click on the file name to see the diff.
The right side of the screen shows the current commit, and the left side of the screen shows the previous commit. The diff information is clearly colored, so you can understand it without further explanation.
By the way, try clicking on the gear symbol in the upper right corner
of the Git Graph screen. You can see the repository and user
information. In the middle, you can see that the User Name is set to
Computer Seminar I and the User Email is set to anonymous@example.org
(an address one can’t reach anywhere). You can leave it as it is, but
if you feel uncomfortable, click on Edit to change it.
(If you are just developing for yourself, you can change it or not. If you plan to share your development history with the network, make sure to use a name and email address that you are comfortable with sharing publicly)
C:/cs1/home/.gitconfig.1.6.2. Source Code Editting
Let’s commit a new change on VSCode. In the editor area, insert two lines into hello.py:
1print("hello, world")
2x = 100
3if x < 0:
4    print("x is negative")
5print(x)
In Python, whitespaces at the beginning of a line (indentation) have a
grammatical meaning. The source code editor recognizes the syntax of
the programming language you are editing and tries to put in the
appropriate indentation. In this example, if you place the cursor at
the end of x = 100 and press Enter to start a new line, it should move
to the beginning of the next line. If you type if x < 0: and start a
new line, the next line will automatically indent by one level (4
characters). Continue typing print("x is negative").
That’s all for now, but remember that you can use the Backspace key to un-indent (shift left) and the Tab key to add one level of indentation (shift right). There is almost no need to use the Space key to indent one space at a time. You might want to take this opportunity to try it out.
The indentation entered with the Tab key in Notepad may look like eight normal spaces, but it is actually a special Tab character. How it is displayed on the screen depends on the viewer’s environment, and in languages like Python where the amount of indentation is meaningful, it is safer not to use the Tab character because of the confusion it causes. Or perhaps I should say, don’t use Notepad.
As you may have already noticed, you sometimes get automatic
assistance when you are typing. For example, when you type an open
parenthesis (, a closing parenthesis is automatically inserted and the
cursor will automatically move to the point before the closing
parenthesis. In some cases, completion candidates such as function
names will appear. If there is only one candidate, press Tab to
confirm. If there are multiple candidates, you can select them with
the cursor keys and press Enter to confirm. You can use completion to
avoid misspellings, so it is a good idea to take advantage of it.
It is a good habit to save your work while you are typing; you can do so by using File ‣ Save, but it may be tedious, so you may want to remember the keyboard shortcut Ctrl + s.
When you save, a basic grammar check will run automatically. If there is a mistake, a red underline will appear. Hover the mouse pointer to see the explanation, and check it carefully to correct it. If you save the file again after correcting the error, the check will run again, and if it is correct, the underline will disappear. Most of the simple errors can be removed in this way even without running the program.
Green and blue do not necessarily indicate errors, but they can be signs of errors, or writing style that is not recommended. It is better to hover the mouse pointer to check the message and fix it if easily possible.
Full-width alphanumeric characters and full-width spaces are highlighted in yellow because they can cause errors that are difficult to identify when they are not in strings or comments.
When you are done with typing, try running it. The meaning of the program is as you probably guessed: since x < 0 is not true at the time of the if statement, the “x is negative” printout is skipped, and the resulting output should be the same as the previous one.
1.6.3. Staging and Commiting
If you open the Git Graph, you should see a line at the top that says Uncommitted Changes. You can see the differences between the current file and the previous version, just as you did when you checked the previous commit.
Show the Source Control sidebar from the activity bar. You should see hello.py in the Changes section. This means that uncommitted changes have been detected.
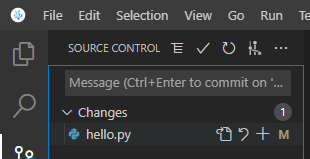
Click the + icon (Stage Changes) to the right of the file name, and hello.py will be moved to the Staged Changes section. This means that you have staged it (you can undo it with the - icon).
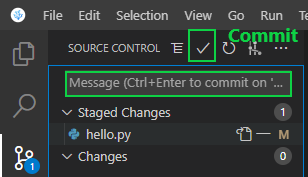
Enter your commit message in the Message area at the top of the sidebar, and click the check mark icon (Commit) to commit. The commit message can be “Add an if statement.” but something similar is also fine.
Check the Git Graph to see the log of your current commit.
Git has a number of features that allow you to combine multiple commits into one and rewrite the commit message. You can learn how to do that after you get used to it.
You can later fix or even delete what you’ve recorded. However, there is nothing you can do about things that are not recorded. At any rate, for now, let’s make it a habit to record things frequently.
It’s not a substitute for a backup, because the history is only stored in the .git folder. Please make sure to backup you files and this folder as well.
1.6.4. Exercise
Problem 1-1
In hello.py, change x = 100 to x = -10. Predict
the result and make sure it is correct. If you are satisfied,
stage the changes and commit them. Think of an appropriate commit
message by yourself.
1.6.5. Retrieving Past Versions
One of the strengths of having a source code management system is that you can retrieve past versions at any time; Git has many powerful features for this purpose, but they are actually quite confusing. In this course, we’ll focus on getting you used to keeping a history of your work, so we’ll keep the number of Git operations you need to learn to a minimum.
Let’s just keep it primitive. First, commit the current version. Even if this version doesn’t work, commit it with a commit message showing that this is the version that doesn’t work. Then you can:
- Open the code of the desired version in the Git Graph, select them all (Ctrl + a), and copy them. Don’t worry about the difference coloring, etc., as it will not be copied.
- Overwrite the current file with it.
- Check how it works, and if you decide to go back to that version, commit it with a message saying that you have reverted to that version. If you don’t want to go back, get back to 1. and re-copy the original version.
If you don’t want to do that, and you really want to get back using Git’s features, see the next Q&A.
The procedure is a bit complicated, but there are only two principles to follow: (1) Reset Hard when moving to another version. (2) Name the current location with Create Branch before moving.
The concrete procedure is as follows:
First, commit the current content.
In the Git Graph, select the most recent commit and right-click and choose Create Branch. Don’t check the Check out option, for example, backup1.
Next, select the commit you want to move to and right-click and choose Reset Current Branch to This Commit (not Rebase Current Branch …, which is right above).
Choose Hard from the Soft, Mixed, and Hard options. (It may say something scary like “Discard all changes”, but it’s OK because you just committed the file.) The file should revert to the state of that version.
- If you have decided to work with that version, continue development. When you commit a new change, you’ll see the history branching on the Git Graph. The old ones are still there, so you can refer to them if you need to.
- If you want to go back to the original commit before the Git graph branches (that is, if you haven’t committed anything since the Reset), you can simply Reset Hard to the original commit. If you’ve branched, it’s the same as the first step, i.e., name the current most recent commit with Create Branch and Reset Hard to the original commit.
Assuming you’re an individual developer, this is probably the least confusing way to do it; Git allows you to branch your development history like a tree, and this way, the current position is always at the top of the default branch, called master.
Don’t forget to give your current position a name by Create Branch before moving elsewhere. If you don’t, it will be difficult to return to that position.
This is not a standard way of using Git, and is only useful when you are developing alone. If you are collaborating with multiple people, please learn the correct way.
Click the gear icon in the upper-right corner of the Git Graph
window to open Repository Settings, and check Include commits
only mentioned by reflogs in the General section.
As you can see from the answer above, Git creates branches in your development history. Each branch can be referred to by a name, the branch name, at the top of the branch.
The initial branch (well, it’s more of a trunk than a branch) that is created when you initialize the repository is named master. When multiple people are working on a project together, if each person commits his or her work to master, it becomes difficult to keep track of it. Therefore, each person’s work should be committed to their own branch that is split off from master. Then, the results of each person’s work will remain independent, so you should consult with your collaborators and merge the contents of the working branches into master at an appropriate time. In addition, we often prepare branches for different purposes and use them in different ways.
If you’re doing small-scale development on your own, you can work directly on master as we do in this textbook, but even in that case, if you want to start over from a previous version, it’s normal to create a branch from that version and work on it, then merge it back into master when you’re done.
However, since this merge operation is quite difficult for beginners, it is not covered in this textbook. Also, the need to be aware of which branch you are working on at any given time can be a burden and a source of confusion for beginners.
Reset Hard, used in the answer above, is a command that forces the location pointed to by the branch name master (assuming you are currently working on master) to the specified version, and makes that version the target of your work. By using this command whenever you move between versions, you will always be working at the top of the master branch, regardless of whether you are doing normal everyday development or in the very act of going back to a previous version due to a problem.
If you do this when you are collaborating with multiple people or sharing your development history on a public server such as GitHub, it will look like the contents of the master branch have suddenly changed to other people, which can be confusing. When you get used to Git, please try to learn how to use it in a more serious way.
1.6.6. Exercise
Problem 1-2
Commit the current state, then go back to the first version that shows “hello, world” and check the behavior (you may or may not commit). After that, go back to the latest state.
1.7. Using the Debugger
Errors and defects in a program are called bugs, and removing them is called debugging. VSCode has a built-in function called a debugger to help you debug.
(Despite the name “debugger”, it does not automatically do the debugging for you. It only helps you to debug yourself.)
If you did the previous exercise seriously, your hello.py should look like this. If you didn’t and the second line is still x = 100, that’s not a problem here:
1print("hello, world")
2x = -10
3if x < 0:
4    print("x is negative")
5print(x)
Click on the left side of the line number in the editor area with the left mouse button. A red circle will appear. Click again to remove it. Adding a red circle is called setting a breakpoint on that line.
As an example, set breakpoints on lines 2 and 5 and run Run ‣ Start Debugging.

I think the execution will pause at the second line. To be precise, it stops just before the second line is executed. This is the role of the breakpoint. Now you can find several icons at the top of the screen. Click on the blue icon (Continue) that looks like a play button. This will let the program to proceed to the next breakpoint. If there is no next breakpoint, the execution will be terminated.
With the same breakpoint setting, run Start Debugging again. After stopping at the second line, click the Step Over icon next to the Continue icon. The execution proceeds by one line. At this point, the variable x should be set to -10 (or 100 if you skipped the exercise). Hover the mouse pointer over x in the editor to see its value.
Alternatively, you can open the Run sidebar from the activity bar (it may have been opened automatically), and you can see the variable status in the Variables area.
The other icons are Step Into (get into the function) and Step Out (get out of the function), but we won’t use them in this example. (The inside of the print function is not written in Python, so Step Into is not possible)
In this way, the debugger allows you to follow the execution line by line while checking the internal state of the program.
1.8. Interactive Excecution
With Python, you can not only write a program in a file and execute it all at once, but you can also enter the program line by line and check the result as you proceed with the calculation. In fact, many of you may be more familiar with using Jupyter Notebook or Google Colaboratory in this way. Of course, you can do this in our pre-configured environment as well.
Run the python command by itself (without specifying a program file) at the command prompt or in the Terminal of the VSCode panel area.
C:\cs1\projects\hello>python
A prompt >>> will appear, so type one line of Python code at a time
and hit Enter.
>>> x = 1
>>> y = 2
>>> x + y
3
>>> quit()
The line after >>> is what you type in, and the line without >>> is what is displayed automatically. the result of x + y is displayed on the fly. To quit, type quit().
You can also enter code with indentation, but it may be a bit tedious. If the code is longer than a certain length, you may want to create a file.
In the next and subsequent chapters, I sometimes show code examples through interactive execution. When you see a code example with >>> at the beginning, please understand that it is an example of interactive execution.
The ipython command is more convenient to use than the python command, as you can use Tab completion and refer to the results of previous lines by writing like Out[3].
In [1]: x = 1

In [2]: y = 2

In [3]: x + y
Out[3]: 3

In [4]: Out[3] - 5
Out[4]: -2

In [5]: quit()
If you are familiar with Jypyter Notebook or similar, and prefer a
similar usability, open and
type jupyter interactive: then “Jupyter: create interactive
window” option becomes available. When you run it, the right half of
the editor area will become a Jypyter Notebook-like environment.
Run Current File in Python
Terminal.Or, if you prefer to run in Jupyter, use Run Current File in
Interactive Window.
We have seen a case where McAfee Livesafe reacted to the file VSCodium.exe and quarantined it. Please restore the quarantined file (or extract this file from the distribution zip file), and change the settings of your anti-virus software not to exclude it from quarantining.
This message appears when python.exe is deleted. Please follow the same procedure as in the previous answer.