8. Advanced Examples
In this chapter, we will run through two more advanced examples of using spring_mass.py, for those who have not yet run out of steam in the previous chapter.
The first is the simulation of a cloth-like object with a spring-mass mesh structure, and the second is a 3-dimensional version by switching the drawing strategy.
8.1. Cloth Simulation
- Mouse Move: Apply external force to surrounding particles according to the mouse speed
- ESC key: Exit
8.1.1. Placing a Spring-Mass Mesh
First, create a file cloth_main.py by copying ver 10.0 of the interactive projectile simulation created in the previous chapter. This is the version just before we added create_spring to ActorFactory.
  1import pygame
  2import spring_mass as spm
  3
  4
  5class ActorFactory:
  6    def __init__(self, world, actor_list):
  7        self.world = world
  8        self.actor_list = actor_list
  9
 10    def create_point_mass(self, pos, fixed=False):
 11        vel = (0, 0)
 12        mass = 1.0
 13        radius = 5
 14        viscous = 0.05
 15        restitution = 0.0
 16        if fixed:
 17            PointMassClass = spm.FixedPointMass
 18            color = "gray"
 19        else:
 20            PointMassClass = spm.PointMass
 21            color = "green"
 22        return PointMassClass(pos, vel, self.world, radius, mass, viscous,
 23                              restitution, spm.CircleDrawer(color, width=0))
 24
 25    def create_spring(self, p1, p2, natural_len=0):
 26        spring_const = 0.5
 27        return spm.Spring(p1, p2, self.world, spring_const, natural_len,
 28                          spm.LineDrawer("white", 1))
 29
 30    def create_collision_resolver(self):
 31        return spm.CollisionResolver(self.world, self.actor_list)
 32
 33    def create_boundary(self, name):
 34        width, height = self.world.size
 35        geometry = {"top": ((0, -1), (0, 0)),
 36                    "bottom": ((0, 1), (0, height)),
 37                    "left": ((-1, 0), (0, 0)),
 38                    "right": ((1, 0), (width, 0))}
 39        normal, point_included = geometry[name]
 40        return spm.Boundary(normal, point_included, self.world, self.actor_list)
 41
 42
 43class AppMain:
 44    def __init__(self):
 45        pygame.init()
 46        width, height = 600, 400
 47        self.screen = pygame.display.set_mode((width, height))
 48
 49        self.world = spm.World((width, height), dt=1.0, gravity_acc=(0, 0.05))
 50        self.actor_list = []
 51        self.factory = ActorFactory(self.world, self.actor_list)
 52
 53        self.actor_list.append(self.factory.create_boundary("top"))
 54        self.actor_list.append(self.factory.create_boundary("bottom"))
 55        self.actor_list.append(self.factory.create_boundary("left"))
 56        self.actor_list.append(self.factory.create_boundary("right"))
 57
 58        self.add_cloth()
 59
 60    def add_cloth(self):
 61        n_columns, n_rows = 16, 12
 62        x_offset, y_offset = 100, 20
 63        spacing = 25
 64        is_fixed = lambda i, j: (j == 0 and i in [0, n_columns // 2, n_columns - 1])
 65        is_leftmost = lambda i, j: (i == 0)
 66        is_topmost = lambda i, j: (j == 0)
 67
 68        plist = []
 69        for j in range(n_rows):
 70            for i in range(n_columns):
 71                pos = (x_offset + i * spacing, y_offset + j * spacing)
 72                p = self.factory.create_point_mass(pos, is_fixed(i, j))
 73                plist.append(p)
 74                self.actor_list.append(p)
 75
 76                if not is_leftmost(i, j):
 77                    sp = self.factory.create_spring(plist[-1], plist[-2], spacing)
 78                    self.actor_list.append(sp)
 79                if not is_topmost(i, j):
 80                    sp = self.factory.create_spring(plist[-1], plist[-1 - n_columns], spacing)
 81                    self.actor_list.append(sp)
 82
 83    def update(self):
 84        for a in self.actor_list:
 85            a.update()
 86        self.actor_list[:] = [a for a in self.actor_list if a.is_alive]
 87
 88    def draw(self):
 89        self.screen.fill(pygame.Color("black"))
 90        for a in self.actor_list:
 91            a.draw(self.screen)
 92        pygame.display.update()
 93
 94    def run(self):
 95        clock = pygame.time.Clock()
 96
 97        while True:
 98            frames_per_second = 60
 99            clock.tick(frames_per_second)
100
101            should_quit = False
102            for event in pygame.event.get():
103                if event.type == pygame.QUIT:
104                    should_quit = True
105                elif event.type == pygame.KEYDOWN and event.key == pygame.K_ESCAPE:
106                    should_quit = True
107            if should_quit:
108                break
109
110            self.update()
111            self.draw()
112
113        pygame.quit()
114
115
116if __name__ == "__main__":
117    AppMain().run()
Then, make the following changes.
- Lines 11-15, 25-28, 49
- A method create_spring is defined in ActorFactory. The parameters of gravity acceleration, spring, and mass are adjusted appropriately.
- Line 52.
- CollisionResolver is removed since it is not used.
- Lines 60-81:
We add a method add_cloth to AppMain. In this method, we use the factory create_point_mass and create_spring to create a mesh of particles connected with springs, and add them to the actor_list.
As a basic structure, the double
forloop starting at lines 69-70 creates the particles in the order from top to bottom, and from left to right within the lines. In addition, spring connections are made as needed. Specifically:- If it is not the leftmost row, connect the current particle to its left neighbor (lines 76-78).
- If it is not the top row, connect the current particle to its upper neighbor (lines 79-81).
To simplify the representation of the “left neighbor” and “upper neighbor”, we have a list plist to which only the particles are added, separate from the actor_list. The last element
plist[-1]is the most recent particle, andplist[-2]is the one next to it on the left. This is where Python’s “negative indexing” of lists comes in handy. The upper neighbor can be represented similarly byplist[-1 - n_columns].The functions is_leftmost and is_topmost are defined as lambda expressions (lines 65-66) to determine if the column is the leftmost or the topmost. If you are wondering what a lambda expression is, please refer to Section 6.6.
In the case of the leftmost, center, and rightmost points of the top line, we place fixed particles (lines 64, 72). The use of the
inoperator in lines 64 and 72 may be unique to Python.
If you run the program, you will see a two-dimensional array of spring-connected particles suspended by gravity.
As a simple example, if we keep the physical parameters as in this sample code and increase only the time step (dt in line 49) a little, the result will easily diverge. To prevent this from happening, we have introduced the symplectic integration scheme as explained in Chapter 5, but it turns out to be not enough.
An easy way to avoid divergence is to make the time step dt smaller. However, of course, the simulation will be displayed in “slow motion” to that extent. To make it displayed at the same speed, if dt is set to one N-th for example, line 110 should be:
for _ in range(N):
    self.update()
to proceed with the calculation for N time steps and then move on to drawing. However, as N increases, the amount of computation increases, making it difficult to run at 60 frames per second.
For a fundamental solution, it is necessary to introduce a more stable numerical integration scheme.
8.1.2. Mouse Interaction
Because it is not so interesting to see a static cloth, let’s introduce mouse interaction. Here, when the mouse pointer moves, it exerts a force on a certain range of particles around it.
 1import pygame
 2import spring_mass as spm
 3
 4
 5def blow_by_mouse(actor_list, mouse_pos, mouse_rel):
 6    mpos = pygame.math.Vector2(mouse_pos)
 7    mrel = pygame.math.Vector2(mouse_rel)
 8    max_distance = 50
 9    sensitivity = 0.002
10    plist = [a for a in actor_list if isinstance(a, spm.PointMass)]
11    for p in plist:
12        distance = (mpos - p.pos).magnitude()
13        if distance <= max_distance:
14            p.receive_force(sensitivity * (max_distance - distance) * mrel)
15
 95    def update(self):
 96        blow_by_mouse(self.actor_list, pygame.mouse.get_pos(), pygame.mouse.get_rel())
 97        for a in self.actor_list:
 98            a.update()
 99        self.actor_list[:] = [a for a in self.actor_list if a.is_alive]
100
In the method update of AppMain, we obtain the current mouse pointer position and velocity and call the function blow_by_mouse (line 96).
In blow_by_mouse, while looping through all the particles in the for statement, if the distance from the mouse pointer position is less than or equal to max_distance, a force proportional to the mouse pointer speed is applied. The proportionality coefficient changes with the distance.
8.1.3. Rupture of Springs
If we replace Spring with FragileSpring, we can achieve the behavior of “tearing” the cloth.
37    def create_spring(self, p1, p2, natural_len=0):
38        spring_const = 0.5
39        break_threshold = 5.0
40        return spm.FragileSpring(p1, p2, self.world, spring_const, natural_len,
41                                 spm.LineDrawer("white", 1), break_threshold)
42
8.2. 3D Simulation and Visualization
In the second example, we extend the spring-mass simulation from two dimensions (2D) to three dimensions (3D).
- Left click: Create a particle
- Right click: Create a fixed particle
- Spacebar click: Create spring-connected particles
- Ctrl key and mouse move: Rotate the coordinate system
- ESC key: Exit
8.2.1. Making spring_mass.py Support 3D Motion
There are two main tasks to do toward 3D extensions. The first is to change the simulation itself from 2D to 3D, and the second is to have the 3D simulation results visualized on a 2D display screen.
The first of these is actually easy. In spring_mass.py, all force and motion calculations are done in vector notation, using pygame.math.Vector2. If you read the pygame reference manual carefully, you may have noticed that pygame also provides a class for 3D vectors, pygame.math.Vector3, so all you need to do is replace Vector2 with Vector3 and manage to initialize its instances.
In fact, the abbreviation name PgVector had been introduced in anticipation of this, instead of using the name pygame.math.Vector2 directly; if you change PgVector to point to pygame.math.Vector3, the fix is basically complete.
 1import pygame
 2
 3
 4PGVECTOR_DIMENSION = 2
 5
 6
 7def PgVector(v):
 8    if PGVECTOR_DIMENSION == 3:
 9        if len(v) == 3:
10            return pygame.math.Vector3(v)
11        else:
12            return pygame.math.Vector3((v[0], v[1], 0))
13    else:
14        return pygame.math.Vector2(v)
15
16
17class World:
18    def __init__(self, size, dt, gravity_acc):
19        self.size = size
20        self.dt = dt
21        self.gravity_acc = PgVector(gravity_acc)
22
23
24class CircleDrawer:
25    def __init__(self, color, width):
26        self.color = pygame.Color(color)
27        self.width = width
28
29    def __call__(self, screen, center, radius):
30        pygame.draw.circle(screen, self.color, center[0:2], radius, self.width)
31
32
33class LineDrawer:
34    def __init__(self, color, width):
35        self.color = pygame.Color(color)
36        self.width = width
37
38    def __call__(self, screen, pos1, pos2):
39        pygame.draw.line(screen, self.color, pos1[0:2], pos2[0:2], self.width)
40
Lines 7-14 are the new definition of PgVector. Since we want to keep the 2D applications that we have made so far, we will make them work in 2D mode by default, and only change to 3D mode when explicitly specified. Depending on whether the PGVECTOR_DIMENSION constant is 2 or 3, Vector2 or Vector3 will be created. If a two-element tuple is given for a Vector3 as a initial value, the third element will be set to 0 (line 12).
The drawing classes CircleDrawer and LineDrawer also need to be modified to support 3D. For now, let’s postfix [0:2] to the PgVector type object. With this, no matter how many dimensions the PgVector has, only the first two elements, i.e., x and y coordinates, will be used (lines 30, 39). So the 2D case will remain unchanged, while the 3D case will display the orthographic projection to the x-y plane.
After making these changes, make sure that the 2D applications interactive_main.py, slinky_drop_main.py, and cloth_main.py work without any problems.
Now, it is time to prepare the main program for the 3D simulation. Copy interactive_main.py to create interactive3d_main.py, and make the following changes.
  1import random
  2import pygame
  3import spring_mass as spm
  4
  5spm.PGVECTOR_DIMENSION = 3
  6
  7
  8class ActorFactory:
  9    def __init__(self, world, actor_list):
 10        self.world = world
 11        self.actor_list = actor_list
 12
 13    def create_point_mass(self, pos, fixed=False):
 14        vel = (random.uniform(-10, 10), random.uniform(-10, 0))
 15        mass = 10
 16        radius = 10
 17        viscous = 0.01
 18        restitution = 0.95
 19        if fixed:
 20            PointMassClass = spm.FixedPointMass
 21            color = "gray"
 22        else:
 23            PointMassClass = spm.PointMass
 24            color = "green"
 25        return PointMassClass(pos, vel, self.world, radius, mass, viscous,
 26                              restitution, spm.CircleDrawer(color, width=0))
 27
 28    def create_spring(self, p1, p2):
 29        spring_const = 0.01
 30        natural_len = 20
 31        break_threshold = 5.0
 32        return spm.FragileSpring(p1, p2, self.world, spring_const, natural_len,
 33                                 spm.LineDrawer("white", width=2), break_threshold)
 34
 35    def create_collision_resolver(self):
 36        return spm.CollisionResolver(self.world, self.actor_list)
 37
 38    def create_boundary(self, name):
 39        width, height = self.world.size
 40        geometry = {"top": ((0, -1), (0, 0)),
 41                    "bottom": ((0, 1), (0, height)),
 42                    "left": ((-1, 0), (0, 0)),
 43                    "right": ((1, 0), (width, 0))}
 44        normal, point_included = geometry[name]
 45        return spm.Boundary(normal, point_included, self.world, self.actor_list)
 46
 47
 48class AppMain:
 49    def __init__(self):
 50        pygame.init()
 51        width, height = 600, 400
 52        self.screen = pygame.display.set_mode((width, height))
 53
 54        self.world = spm.World((width, height), dt=1.0, gravity_acc=(0, 0.1))
 55        self.actor_list = []
 56        self.factory = ActorFactory(self.world, self.actor_list)
 57
 58        self.actor_list.append(self.factory.create_collision_resolver())
 59        self.actor_list.append(self.factory.create_boundary("top"))
 60        self.actor_list.append(self.factory.create_boundary("bottom"))
 61        self.actor_list.append(self.factory.create_boundary("left"))
 62        self.actor_list.append(self.factory.create_boundary("right"))
 63
 64        self.point_mass_prev = None
 65
 66    def add_connected_point_mass(self, pos, button):
 67        if button == 1:
 68            fixed = False
 69        elif button == 3:
 70            fixed = True
 71        else:
 72            return
 73        p = self.factory.create_point_mass(pos, fixed)
 74        self.actor_list.append(p)
 75
 76        if self.point_mass_prev is not None:
 77            sp = self.factory.create_spring(p, self.point_mass_prev)
 78            self.actor_list.append(sp)
 79        if pygame.key.get_pressed()[pygame.K_SPACE]:
 80            self.point_mass_prev = p
 81
 82    def update(self):
 83        for a in self.actor_list:
 84            a.update()
 85        self.actor_list[:] = [a for a in self.actor_list if a.is_alive]
 86
 87    def draw(self):
 88        self.screen.fill(pygame.Color("black"))
 89        for a in self.actor_list:
 90            a.draw(self.screen)
 91        pygame.display.update()
 92
 93    def run(self):
 94        clock = pygame.time.Clock()
 95
 96        while True:
 97            frames_per_second = 60
 98            clock.tick(frames_per_second)
 99
100            should_quit = False
101            for event in pygame.event.get():
102                if event.type == pygame.QUIT:
103                    should_quit = True
104                elif event.type == pygame.KEYDOWN and event.key == pygame.K_ESCAPE:
105                    should_quit = True
106                elif event.type == pygame.KEYUP and event.key == pygame.K_SPACE:
107                    self.point_mass_prev = None
108                elif event.type == pygame.MOUSEBUTTONDOWN:
109                    self.add_connected_point_mass(event.pos, event.button)
110            if should_quit:
111                break
112
113            self.update()
114            self.draw()
115
116        pygame.quit()
117
118
119if __name__ == "__main__":
120    AppMain().run()
First, import the spring_mass module with the name spm as usual, and then rewrite spm.PGVECTOR_DIMENSION to 3 (line 5). It’s not very polite to rewrite global constants in a module like this, but, well, let’s not worry about it.
In line 14, we set the initial velocity of the particle, and in line 54, we define the acceleration of gravity. The values may be different in your source code because you may have tried different values in the previous chapter. The above values are the original ones used in the previous chapter’s sample code. You can also set them to whatever you like.
When you run it, you should see the results of the 3D simulation!
…Huh? Doesn’t look like anything has changed? Well, that’s true, because we made the PgVector to have a z component of 0 when it is initialized with only two elements, so the initial z position of all the actors is 0, and the initial z velocity is also 0, so the z position will remain 0 forever. As a result, nothing looks different since we are just orthographically projecting something that is moving in the x-y plane onto the x-y plane.
If you change line 14 to give a random initial velocity in the z direction as well, you will see that the collisions between the particles will no longer occur. The reason is that the z-positions between the particles do not generally coincide.
However, this is not very interesting, so let’s move on to the visualization process.
8.2.2. 3D Visualization Module vis3d.py
If you want to do full-fledged 3D visualization, you will need to use either a low-level 3D rendering library such as OpenGL or DirectX, or some other high-level library that uses them internally. However, we will not learn a new library here, but use only pygame’s functionality to achieve simple 3D visualization.
In the spring_mass module, the drawing process of actors can be replaced through the use of the Strategy pattern. We just modified the default CircleDrawer and LineDrawer to perform orthographic projection to the x-y plane, but if we create new CircleDrawer and LineDrawer that perform different projections and use them, the visualization results will be replaced.
Although it is possible to define them in interactive3d_main.py, we will create a new module called vis3d.py so that we can reuse it from other applications.
 1import pygame
 2
 3
 4class View:
 5    def __init__(self, world):
 6        self.world = world
 7
 8    def project_point(self, pos):
 9        width = self.world.size[0]
10        pos_screen = (pos[2] + width/2, pos[1])
11        return pos_screen
12
13
14class CircleDrawer:
15    def __init__(self, view, color, width):
16        self.view = view
17        self.color = pygame.Color(color)
18        self.width = width
19
20    def __call__(self, screen, center, radius):
21        center_screen = self.view.project_point(center)
22        pygame.draw.circle(screen, self.color, center_screen, radius, self.width)
23
24
25class LineDrawer:
26    def __init__(self, view, color, width):
27        self.view = view
28        self.color = pygame.Color(color)
29        self.width = width
30
31    def __call__(self, screen, pos1, pos2):
32        pos1_screen = self.view.project_point(pos1)
33        pos2_screen = self.view.project_point(pos2)
34        pygame.draw.line(screen, self.color, pos1_screen, pos2_screen, self.width)
In this module, we define two new classes, CircleDrawer and LineDrawer. Because both of them need a common functionality of projecting from 3D space to 2D screen, we put that common part in a separate class called View.
The projection from 3D to 2D is done by a method project_point. Since
it would be confusing to implement an elaborate projection from the
beginning, we will start by implementing a simple orthographic
projection to the y-z plane. In line 10, we use the z-component
(pos[2]) of the given 3D coordinate pos as the x-coordinate in the
screen, and the y-component (pos[1]) as the y-coordinate in the
screen. However, to have the actor at z = 0 drawn in the center of
the screen, we add width/2 to pos[2].
CircleDrawer and LineDrawer share an instance of View, and whenever a drawing request comes in, they convert the 3D space coordinates to 2D screen coordinates (lines 21, 32-33) using it, and accomplish drawing.
Now we need to modify interactive3d_main.py to use this new drawing class.
  1import random
  2import pygame
  3import spring_mass as spm
  4import vis3d
  5
  6spm.PGVECTOR_DIMENSION = 3
  7
  8
  9class ActorFactory:
 10    def __init__(self, world, view, actor_list):
 11        self.world = world
 12        self.view = view
 13        self.actor_list = actor_list
 14
 15    def create_point_mass(self, pos, fixed=False):
 16        vel = (random.uniform(-10, 10), random.uniform(-10, 0))
 17        mass = 10
 18        radius = 10
 19        viscous = 0.01
 20        restitution = 0.95
 21        if fixed:
 22            PointMassClass = spm.FixedPointMass
 23            color = "gray"
 24        else:
 25            PointMassClass = spm.PointMass
 26            color = "green"
 27        return PointMassClass(pos, vel, self.world, radius, mass, viscous,
 28                              restitution, vis3d.CircleDrawer(self.view, color, width=0))
 29
 30    def create_spring(self, p1, p2):
 31        spring_const = 0.01
 32        natural_len = 20
 33        break_threshold = 5.0
 34        return spm.FragileSpring(p1, p2, self.world, spring_const, natural_len,
 35                                 vis3d.LineDrawer(self.view, "white", width=2), break_threshold)
 36
 37    def create_collision_resolver(self):
 38        return spm.CollisionResolver(self.world, self.actor_list)
 39
 40    def create_boundary(self, name):
 41        width, height = self.world.size
 42        geometry = {"top": ((0, -1), (0, 0)),
 43                    "bottom": ((0, 1), (0, height)),
 44                    "left": ((-1, 0), (0, 0)),
 45                    "right": ((1, 0), (width, 0))}
 46        normal, point_included = geometry[name]
 47        return spm.Boundary(normal, point_included, self.world, self.actor_list)
 48
 49
 50class AppMain:
 51    def __init__(self):
 52        pygame.init()
 53        width, height = 600, 400
 54        self.screen = pygame.display.set_mode((width, height))
 55
 56        self.world = spm.World((width, height), dt=1.0, gravity_acc=(0, 0.1))
 57        self.view = vis3d.View(self.world)
 58        self.actor_list = []
 59        self.factory = ActorFactory(self.world, self.view, self.actor_list)
 60
 61        self.actor_list.append(self.factory.create_collision_resolver())
 62        self.actor_list.append(self.factory.create_boundary("top"))
 63        self.actor_list.append(self.factory.create_boundary("bottom"))
 64        self.actor_list.append(self.factory.create_boundary("left"))
 65        self.actor_list.append(self.factory.create_boundary("right"))
 66
 67        self.point_mass_prev = None
 68
 69    def add_connected_point_mass(self, pos, button):
 70        if button == 1:
 71            fixed = False
 72        elif button == 3:
 73            fixed = True
 74        else:
 75            return
 76        p = self.factory.create_point_mass(pos, fixed)
 77        self.actor_list.append(p)
 78
 79        if self.point_mass_prev is not None:
 80            sp = self.factory.create_spring(p, self.point_mass_prev)
 81            self.actor_list.append(sp)
 82        if pygame.key.get_pressed()[pygame.K_SPACE]:
 83            self.point_mass_prev = p
 84
 85    def update(self):
 86        for a in self.actor_list:
 87            a.update()
 88        self.actor_list[:] = [a for a in self.actor_list if a.is_alive]
 89
 90    def draw(self):
 91        self.screen.fill(pygame.Color("black"))
 92        for a in self.actor_list:
 93            a.draw(self.screen)
 94        pygame.display.update()
 95
 96    def run(self):
 97        clock = pygame.time.Clock()
 98
 99        while True:
100            frames_per_second = 60
101            clock.tick(frames_per_second)
102
103            should_quit = False
104            for event in pygame.event.get():
105                if event.type == pygame.QUIT:
106                    should_quit = True
107                elif event.type == pygame.KEYDOWN and event.key == pygame.K_ESCAPE:
108                    should_quit = True
109                elif event.type == pygame.KEYUP and event.key == pygame.K_SPACE:
110                    self.point_mass_prev = None
111                elif event.type == pygame.MOUSEBUTTONDOWN:
112                    self.add_connected_point_mass(event.pos, event.button)
113            if should_quit:
114                break
115
116            self.update()
117            self.draw()
118
119        pygame.quit()
120
121
122if __name__ == "__main__":
123    AppMain().run()
First, ActorFactory receives and holds a View instance at initialization (lines 10, 12). Then, the drawing strategy passed to PointMass is replaced with a vis3d.CircleDrawer instance, instead of spm.CircleDrawer (line 28). The same goes for Spring (line 35). Don’t forget that you need to pass self.view to them.
In the __init__ method of AppMain, we create an instance of View (line 57) and pass it to the factory when it is created (line 59).
When this is done, we can view the actors moving in the x-y plane orthographically projected onto the y-z plane. You can see that they are moving in a straight vertical line in the center of the screen, which is the correct behavior since the x-y plane becomes a straight line when it is projected onto the y-z plane. …Do you see what I mean?
Now that we can visualize the z-component, let’s give non-zero z-component to the initial velocity. In this example, z component has a random positive value. On the screen, it should be flying to the right. This is the positive direction of z.
15    def create_point_mass(self, pos, fixed=False):
16        vel = (random.uniform(-10, 10), random.uniform(-10, 0), random.uniform(-0, 10))
17        mass = 10
18        radius = 10
19        viscous = 0.01
20        restitution = 0.95
If this is all we do, it will fly away in the positive direction of z and not come back, so let’s build walls in the front and back in the z direction.
40    def create_boundary(self, name):
41        width, height, depth = self.world.size
42        geometry = {"top": ((0, -1, 0), (0, 0, 0)),
43                    "bottom": ((0, 1, 0), (0, height, 0)),
44                    "left": ((-1, 0, 0), (0, 0, 0)),
45                    "right": ((1, 0, 0), (width, 0, 0)),
46                    "front": ((0, 0, -1), (0, 0, -depth/2)),
47                    "back": ((0, 0, 1), (0, 0, depth/2))}
48        normal, point_included = geometry[name]
49        return spm.Boundary(normal, point_included, self.world, self.actor_list)
50
51
52class AppMain:
53    def __init__(self):
54        pygame.init()
55        width, height, depth = 600, 400, 500
56        self.screen = pygame.display.set_mode((width, height))
57
58        self.world = spm.World((width, height, depth), dt=1.0, gravity_acc=(0, 0.1))
59        self.view = vis3d.View(self.world)
60        self.actor_list = []
61        self.factory = ActorFactory(self.world, self.view, self.actor_list)
62
63        self.actor_list.append(self.factory.create_collision_resolver())
64        self.actor_list.append(self.factory.create_boundary("top"))
65        self.actor_list.append(self.factory.create_boundary("bottom"))
66        self.actor_list.append(self.factory.create_boundary("left"))
67        self.actor_list.append(self.factory.create_boundary("right"))
68        self.actor_list.append(self.factory.create_boundary("front"))
69        self.actor_list.append(self.factory.create_boundary("back"))
70
71        self.point_mass_prev = None
The width and height are kept to be 600 and 400, respectively, and depth = 500 is newly defined (line 55) and passed to the World type object (line 58). The reason why we changed the definition of World when we started Chapter 7 was because here we want to initialize it with either 2 or 3 elements.
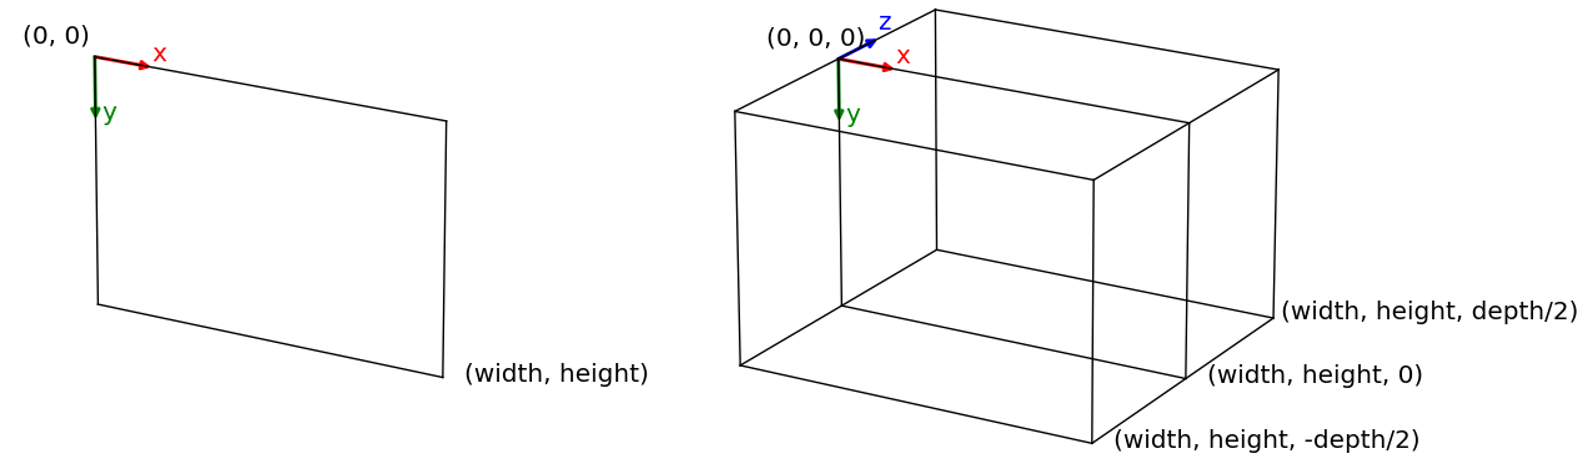
In the create_boundary method of ActorFactory, we can use this depth value in creating “front” and “back” walls (lines 41-47), which are put at z = -depth/2 and z = depth/2, respectively. The 2D screen coordinate system and the 3D space coordinate system are shown in the figure below.
If you modify __init__ of AppMain to create the front and back walls (lines 68-69), you should see them bounce at those locations. Notice that the Boundary class is also naturally extended to 3D.
In the following sections, we will rotate the coordinate system and change the projection method. For them to be clearly visible, let’s visualize the walls as a wireframe.
 6spm.PGVECTOR_DIMENSION = 3
 7
 8
 9def draw_wireframe(screen, size, view):
10    width, height, depth = size
11    line_drawer = vis3d.LineDrawer(view, "gray64", 1)
12    dot_drawer = vis3d.CircleDrawer(view, "gray64", 0)
13
14    x_list = [0, width]
15    y_list = [0, height]
16    z_list = [-depth/2, depth/2]
17    for y in y_list:
18        for z in z_list:
19            x1, x2 = x_list
20            line_drawer(screen, (x1, y, z), (x2, y, z))
21    for x in x_list:
22        for z in z_list:
23            y1, y2 = y_list
24            line_drawer(screen, (x, y1, z), (x, y2, z))
25    for x in x_list:
26        for y in y_list:
27            z1, z2 = z_list
28            line_drawer(screen, (x, y, z1), (x, y, z2))
29    dot_drawer(screen, (0, 0, 0), radius=5)
30
31
32class ActorFactory:
117    def draw(self):
118        self.screen.fill(pygame.Color("black"))
119        draw_wireframe(self.screen, self.world.size, self.view)
120        for a in self.actor_list:
121            a.draw(self.screen)
122        pygame.display.update()
A function called draw_wireframe is defined and it is called in the draw method of AppMain (line 119). In draw_wireframe, we draw each edge of the cuboid comprising of the six walls (lines 17-28), and a small circle at the coordinate origin (line 29).
It is worth noting that these drawings are also done by vis3d.LineDrawer and vis3d.CircleDrawer. This means that when we change the contents of the View, the coordinates of not only the Actor but also the wireframe will be transformed appropriately.
At this point, only vertical lines are drawn at the front and back wall positions, because we implemented the orthographic projection to the y-z plane. If you can confirm that the bounce is happening at the correct position, you are good to go.
8.2.3. Coordinate Transformation
To make the display look a little more like 3D, let’s implement rotation and scaling of the coordinate system. The rotation and scaling is done around the center of the cuboid comprising of the six walls.
The formulation of coordinate transformations requires knowledge of linear algebra, but pygame.math.Vector3 has a method for performing rotations. So you don’t need to do the detailed calculations yourself.
However, we should note that the rotation method available in Vector3 performs a rotation around the origin. In our definition, the origin is not the center of the cuboid, so we need to translate the coordinate system before rotation.
Also, scaling must be applied not only to the position of the particles, but also to the radius.
 1import pygame
 2from spring_mass import PgVector
 3
 4
 5class View:
 6    def __init__(self, world):
 7        self.world = world
 8        self.mag = 0.5
 9        self.rot_x = 15
10        self.rot_y = 15
11
12    def project_point(self, pos, radius):
13        w, h, _ = self.world.size
14        pos_translated = PgVector(pos) - PgVector((w/2, h/2, 0))
15        pos_rotated = pos_translated.rotate_y(self.rot_y).rotate_x(self.rot_x)
16        pos_scaled = pos_rotated * self.mag
17        pos_screen = (pos_scaled[0] + w/2, pos_scaled[1] + h/2)
18        radius_screen = radius * self.mag
19        return pos_screen, radius_screen
20
21
22class CircleDrawer:
23    def __init__(self, view, color, width):
24        self.view = view
25        self.color = pygame.Color(color)
26        self.width = width
27
28    def __call__(self, screen, center, radius):
29        center_screen, radius_screen = self.view.project_point(center, radius)
30        pygame.draw.circle(screen, self.color, center_screen, radius_screen, self.width)
31
32
33class LineDrawer:
34    def __init__(self, view, color, width):
35        self.view = view
36        self.color = pygame.Color(color)
37        self.width = width
38
39    def __call__(self, screen, pos1, pos2):
40        pos1_screen, _ = self.view.project_point(pos1, 0)
41        pos2_screen, _ = self.view.project_point(pos2, 0)
42        pygame.draw.line(screen, self.color, pos1_screen, pos2_screen, self.width)
First, we prepare some View attributes: magnification factor mag,
and rotation angles around the x- and y-axes rot_x and rot_y
(lines 8-10).
To transform both the position and radius, we add a radius argument to the project_point method and change the return value to a tuple of position and radius.
At first glance, the process of the coordinate transformation may look complicated, but it is not so difficult if you look at it in order:
- Translate such that the center of the cuboid becomes at the origin (line 14)
- Rotate around the center of the cuboid (line 15)
- Zoom in or out (line 16)
- Orthographically project onto the x-y plane, then return the origin to the upper left corner of the screen (line 17)
- Scale the radius (line 18)
Now you should see the result visualized from a slightly oblique perspective. Try rewriting the rotation angle and magnification factor in various ways.
Note that the position where the mouse is clicked and the position where the particle is created will not be the same on the screen. When you click on the screen coordinates (x, y), a particle will be created at the 3D position (x, y, 0), which is however displayed after translation, rotation, and scaling. We’ll fix it later.
8.2.4. Perspective Projection
Now you can calculate and display motions in 3D, but you may feel that it is not enough. You can make it look more like 3D by implementing perspective projection, which makes near objects appear larger and far objects appear smaller.
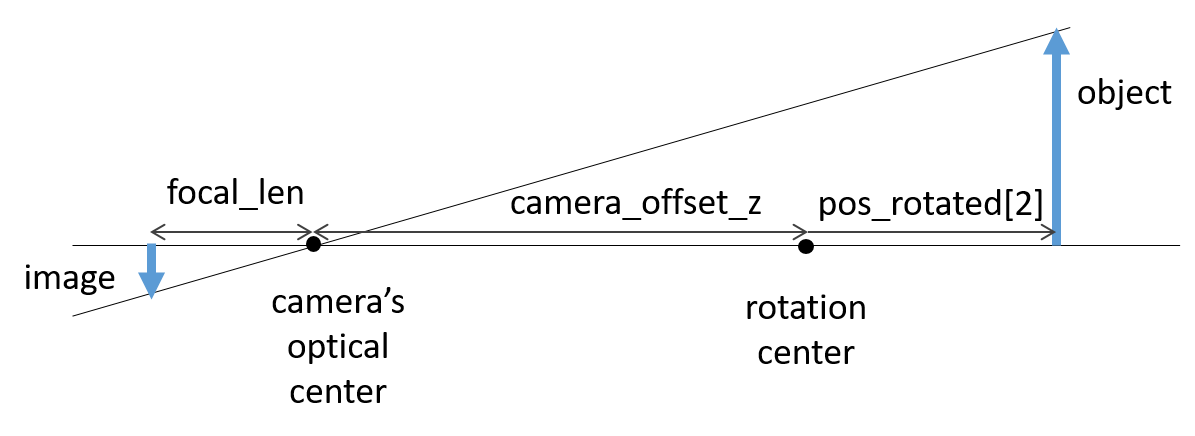
The concept of perspective projection is not difficult to understand. The optical center of a virtual camera is located at the viewpoint. Rays of light from an object pass through the optical center and create an image on a screen (or a film, or an image sensor) located at a focal distance from the optical center. If the distance (depth) from the optical center to the object is d and the focal length is f, the ratio of the size of the image to that of the object (magnification factor) is f/d, based on the similarity of the triangle.
The scaling factor that was given as a constant for orthographic projection is changed to be calculated in this way.
 5class View:
 6    def __init__(self, world):
 7        self.world = world
 8        self.camera_offset_z = 2000
 9        self.focal_len = 1000
10        self.rot_x = 15
11        self.rot_y = 15
12
13    def project_point(self, pos, radius):
14        w, h, _ = self.world.size
15        pos_translated = PgVector(pos) - PgVector((w/2, h/2, 0))
16        pos_rotated = pos_translated.rotate_y(self.rot_y).rotate_x(self.rot_x)
17
18        depth_from_camera = self.camera_offset_z + pos_rotated[2]
19        mag = self.focal_len / depth_from_camera
20
21        pos_scaled = pos_rotated * mag
22        pos_screen = (pos_scaled[0] + w/2, pos_scaled[1] + h/2)
23        radius_screen = radius * mag
24        return pos_screen, radius_screen
25
26
27class CircleDrawer:
Instead of the magnification factor, the focal length focal_len and
the distance from the viewpoint to the center of rotation
camera_offset_z are provided as attributes of View (lines
8-9). The line of sight is assumed to be in the positive direction of
z axis and pass through the center of rotation.
The depth d is obtained by adding the depth from the center of
rotation to the object position, pos_rotated[2], to
camera_offset_z. This allows us to calculate the magnification
factor (lines 18-19).
Perspective projection of a 3D sphere will generally result in an ellipse on the screen. However, it’s too strict, so let’s approximate it as a circle. The radius is scaled up or down at the same rate as the position (line 23).
This completes the implementation of perspective projection. As with the wireframe, the size of the particles should also be displayed according to perspective. It may be difficult to see this because of the small size of the particles. You can increase the radius to your liking.
38    def create_point_mass(self, pos, fixed=False):
39        vel = (random.uniform(-10, 10), random.uniform(-10, 0), random.uniform(-0, 10))
40        mass = 10
41        radius = 30
42        viscous = 0.01
43        restitution = 0.95
8.2.5. Mouse Interaction
You may want to rotate the coordinate system with the mouse. Let’s add methods to change the amount of rotation.
In addition, we allow focal_len and camera_offset_z to be given when the View is initialized. If you are so inclined, you may find it interesting to allow the mouse wheel to change these values.
 5class View:
 6    def __init__(self, world, camera_offset_z, focal_len):
 7        self.world = world
 8        self.camera_offset_z = camera_offset_z
 9        self.focal_len = focal_len
10        self.rot_x = 15
11        self.rot_y = 15
12
13    def rotate_x_by(self, deg):
14        self.rot_x += deg
15
16    def rotate_y_by(self, deg):
17        self.rot_y += deg
18
19    def project_point(self, pos, radius):
The added methods are used to control the amount of rotation from the AppMain side. In this example, when the mouse is moved while holding down the Ctrl key, the coordinate system is rotated according to the amount of movement.
75class AppMain:
76    def __init__(self):
77        pygame.init()
78        width, height, depth = 600, 400, 500
79        self.screen = pygame.display.set_mode((width, height))
80
81        self.world = spm.World((width, height, depth), dt=1.0, gravity_acc=(0, 0.1))
82        self.view = vis3d.View(self.world, 2000, 1000)
83        self.actor_list = []
84        self.factory = ActorFactory(self.world, self.view, self.actor_list)
124    def run(self):
125        clock = pygame.time.Clock()
126
127        while True:
128            frames_per_second = 60
129            clock.tick(frames_per_second)
130
131            should_quit = False
132            for event in pygame.event.get():
133                if event.type == pygame.QUIT:
134                    should_quit = True
135                elif event.type == pygame.KEYDOWN and event.key == pygame.K_ESCAPE:
136                    should_quit = True
137                elif event.type == pygame.KEYUP and event.key == pygame.K_SPACE:
138                    self.point_mass_prev = None
139                elif event.type == pygame.MOUSEBUTTONDOWN:
140                    self.add_connected_point_mass(event.pos, event.button)
141            if should_quit:
142                break
143
144            mouse_dx, mouse_dy = pygame.mouse.get_rel()
145            if pygame.key.get_pressed()[pygame.K_LCTRL]:
146                rot_sensitivity = 0.1
147                self.view.rotate_x_by(mouse_dy * rot_sensitivity)
148                self.view.rotate_y_by(-mouse_dx * rot_sensitivity)
149
150            self.update()
151            self.draw()
There is one task left to be done. It is to correctly reflect the mouse click position to the position of particle creating in the 3D space.
Since this is a 2D to 3D conversion, the depth needs to be given as some kind of prior information. Here, we determine it to be on the plane whose depth from the viewpoint is camera_offset_z.
This process is implemented in View as the unproject_point method.
32    def unproject_point(self, pos_screen):
33        w, h, _ = self.world.size
34        mag = self.focal_len / self.camera_offset_z
35
36        pos_scaled_x, pos_scaled_y = pos_screen[0] - w/2, pos_screen[1] - h/2
37        pos_rotated = PgVector((pos_scaled_x / mag, pos_scaled_y / mag, 0))
38        pos_translated = pos_rotated.rotate_x(-self.rot_x).rotate_y(-self.rot_y)
39        pos = pos_translated + PgVector((w/2, h/2, 0))
40        return pos
41
42
43class CircleDrawer:
Basically, we just follow the process of project_point in reverse order. Note that the rotation order must also be reversed (line 38).
Having the depth on a deterministic plane is achieved by setting the denominator in line 34 to be camera_offset_z and setting the z component of pos_rotated to 0 in line 37.
131            should_quit = False
132            for event in pygame.event.get():
133                if event.type == pygame.QUIT:
134                    should_quit = True
135                elif event.type == pygame.KEYDOWN and event.key == pygame.K_ESCAPE:
136                    should_quit = True
137                elif event.type == pygame.KEYUP and event.key == pygame.K_SPACE:
138                    self.point_mass_prev = None
139                elif event.type == pygame.MOUSEBUTTONDOWN:
140                    self.add_connected_point_mass(self.view.unproject_point(event.pos),
141                                                  event.button)
142            if should_quit:
143                break
By applying this transformation when creating a particle in AppMain, the particle should appear at the clicked position on the screen.
If you right-click to create multiple fixed particles and then rotate the coordinate system, you will understand the meaning of “to be on the plane whose depth from the viewpoint is camera_offset_z”.
8.2.6. Expression of Occlusions
As long as all the particles are drawn in the same color, you will not feel any discomfort with the above implementation. However, you will notice that something is wrong as soon as you display particles of different colors.
Let’s modify the factory to change the color of the particles each time they are created.
32class ActorFactory:
33    def __init__(self, world, view, actor_list):
34        self.world = world
35        self.view = view
36        self.actor_list = actor_list
37        self.color_list = ["red", "magenta", "blue", "cyan", "green", "yellow"]
38        self.color_index = 0
39
40    def create_point_mass(self, pos, fixed=False):
41        vel = (random.uniform(-10, 10), random.uniform(-10, 0), random.uniform(-0, 10))
42        mass = 10
43        radius = 30
44        viscous = 0.01
45        restitution = 0.95
46        if fixed:
47            PointMassClass = spm.FixedPointMass
48            color = "gray"
49        else:
50            PointMassClass = spm.PointMass
51            color = self.color_list[self.color_index]
52            self.color_index = (self.color_index + 1) % len(self.color_list)
53        return PointMassClass(pos, vel, self.world, radius, mass, viscous,
54                              restitution, vis3d.CircleDrawer(self.view, color, width=0))
55
56    def create_spring(self, p1, p2):
Do you see what is happening? The occlusion caused by the back and forth relationship of particles is not correctly expressed.
A simple solution to this problem is to draw the objects in order of distance from the viewpoint. This is sometimes called a painter’s algorithm because it is similar to the way an oil painting is done, where the object in the back is overpainted by the object in the front (although I am not sure we would call it an algorithm). This is sufficient for expressing the back and forth relationship of spheres whose volumes do not overlap with each other.
42    def depth(self, pos):
43        w, h, _ = self.world.size
44        pos_translated = PgVector(pos) - PgVector((w/2, h/2, 0))
45        pos_rotated = pos_translated.rotate_y(self.rot_y).rotate_x(self.rot_x)
46        depth_from_camera = self.camera_offset_z + pos_rotated[2]
47        return depth_from_camera
48
49
50class CircleDrawer:
Let’s add a method depth that returns the depth from the viewpoint
position in the View class. The implementation is the same as the one
calculated in the middle of project_point.
120    def draw(self):
121        self.screen.fill(pygame.Color("black"))
122        draw_wireframe(self.screen, self.world.size, self.view)
123        plist = [a for a in self.actor_list if isinstance(a, spm.PointMass)]
124        rest = [a for a in self.actor_list if not isinstance(a, spm.PointMass)]
125        plist.sort(key=lambda p: self.view.depth(p.pos), reverse=True)
126        for a in rest + plist:
127            a.draw(self.screen)
128        pygame.display.update()
Using this method, AppMain draws particles in depth order. First, we
extract only the particles from actor_list to plist and the remaining
actors to the rest (lines 123-124). Then we sort plist in
descending order of depth (line 125), and draw rest and plist.
You should now be able to draw without any discomfort.
The painter’s algorithm is easy to think about and implement, but it is limited in what it can express. For example, try removing CollisionResolver and allow the particles to overlap. This should result in a picture of spheres squeezing into each other, but of course such a drawing result is not possible.
More generally, in 3D graphics, object shapes are usually represented as small triangles, squares, or other polygons stitched together, and the same problem occurs between polygons.
Therefore, depth comparison is done pixel by pixel for full-fledged 3D graphics. The most commonly used method is called the depth buffer method (or z buffer method), which writes not only the color but also the depth of each pixel when drawing a figure on a 2D screen. If the depth already written at the location is smaller than the depth that is being written, neither the color nor the depth is updated.
In addition to such depth comparisons, 3D graphics requires a large amount of computation for coordinate transformations, shading calculations, and so on. The hardware used to perform these computations in parallel at high speed is called a GPU (Graphics Processing Unit). GPUs are now widely used not only for 3D graphics computation, but also for scientific computation, machine learning, and many other applications.